
Hey there! If you’re on the hunt for ways to infuse a personal and creative touch into your living space without breaking the bank, then you’re in luck. Easy and accessible DIY painting canvas ideas provide you the opportunity to paint your very own canvas art right in the comfort of your home. These exciting projects typically require only a few basic supplies, allowing you to create beautiful pieces that feel distinctly unique and intimately connected to your personal space, especially if you have a preference for soft, natural vibes that bring warmth and tranquility to your surroundings.
This is precisely why these DIY painting projects are so beneficial for busy individuals like ourselves. The majority of these creations can be completed in just an afternoon, making them a perfect fit for our hectic schedules. Additionally, they seamlessly blend into rooms adorned with neutral tones, enhancing the overall aesthetic without overwhelming the existing decor.
You can always mix your own pieces with curated textured wall art from My Home Art Decor.
Let’s break it down from there.

I want to show you a few ways I actually make textured painting on painted canvas pieces for my own walls. They’re simple, they don’t cost much, and they end up looking way more special than anything I could grab off the shelf. I lean toward soft, organic colors because that’s what feels right in my house, but you can switch the palette however you like.
Whether you’re looking for easy DIY canvas painting ideas or a step-by-step tutorial for a large canvas, there are plenty of DIY canvas art ideas to explore. Using acrylic paint, you can create beautiful art that doubles as home decor and a fun art project. From large-scale art pieces to simple canvas ideas, there’s something for every beginner. Consider using techniques like ombre or the brushstroke technique to add texture and depth to your piece of art. Don’t forget to gather some paint colors and a good paintbrush to get started on your DIY canvas painting tutorial!
Here’s the real stuff you need (nothing fancy):
That’s it. I already had most of this from past projects, so I only spent about twelve dollars last time.
Read: DIY Textured Canvas Wall Art with Drywall Mud (Cheap & Easy!)
Let me walk you through three pieces I’ve made lately that always get compliments. You can do any one of them this weekend.
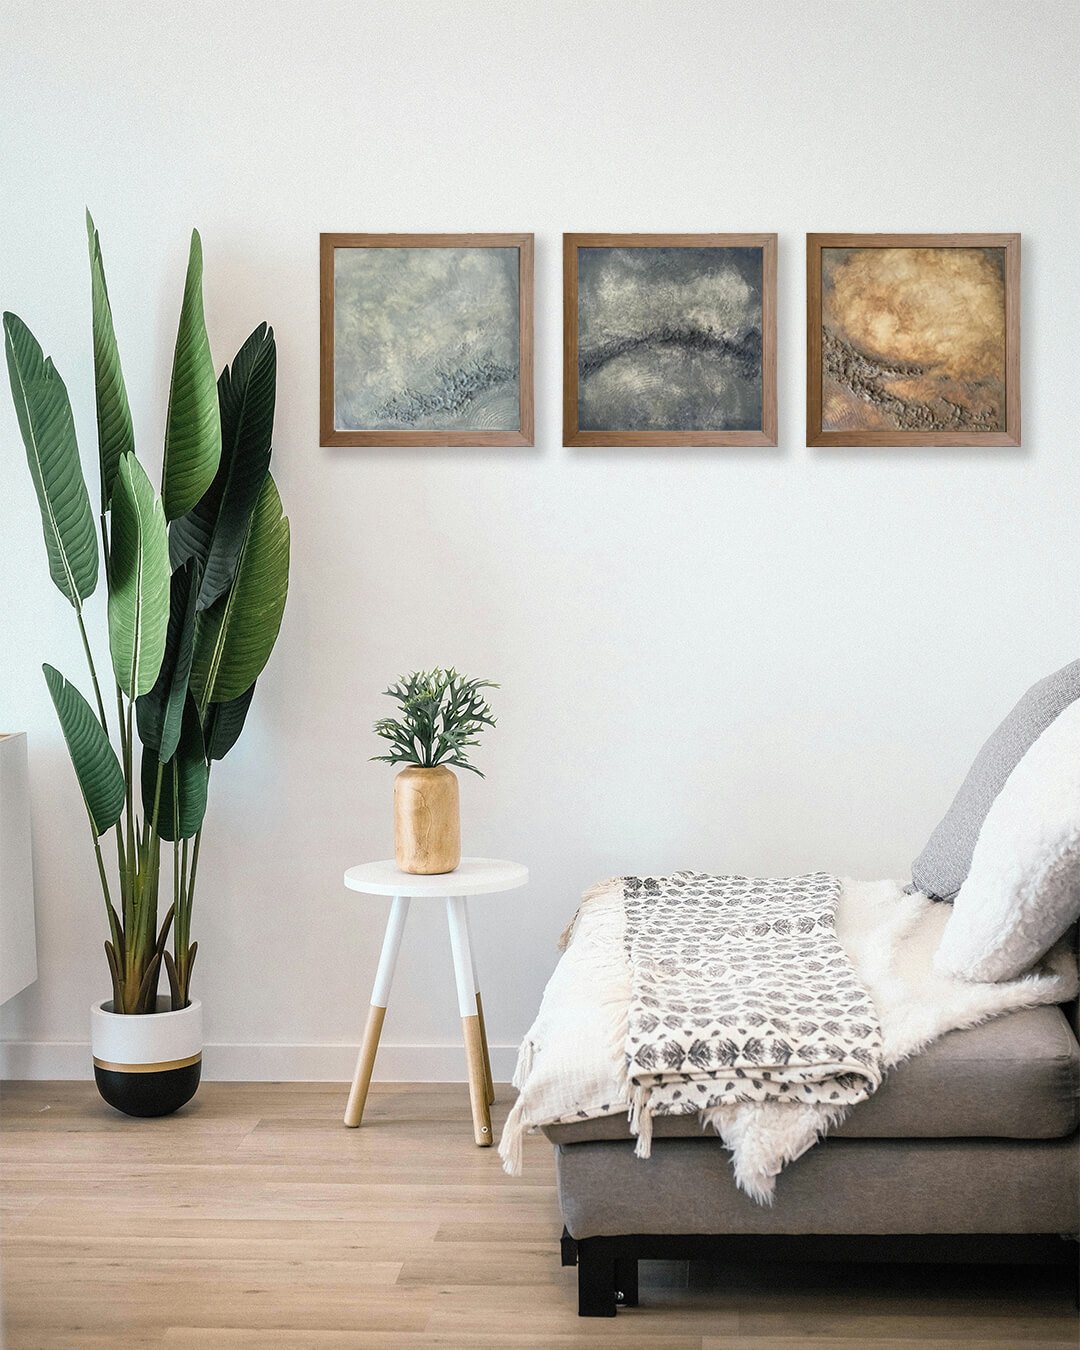
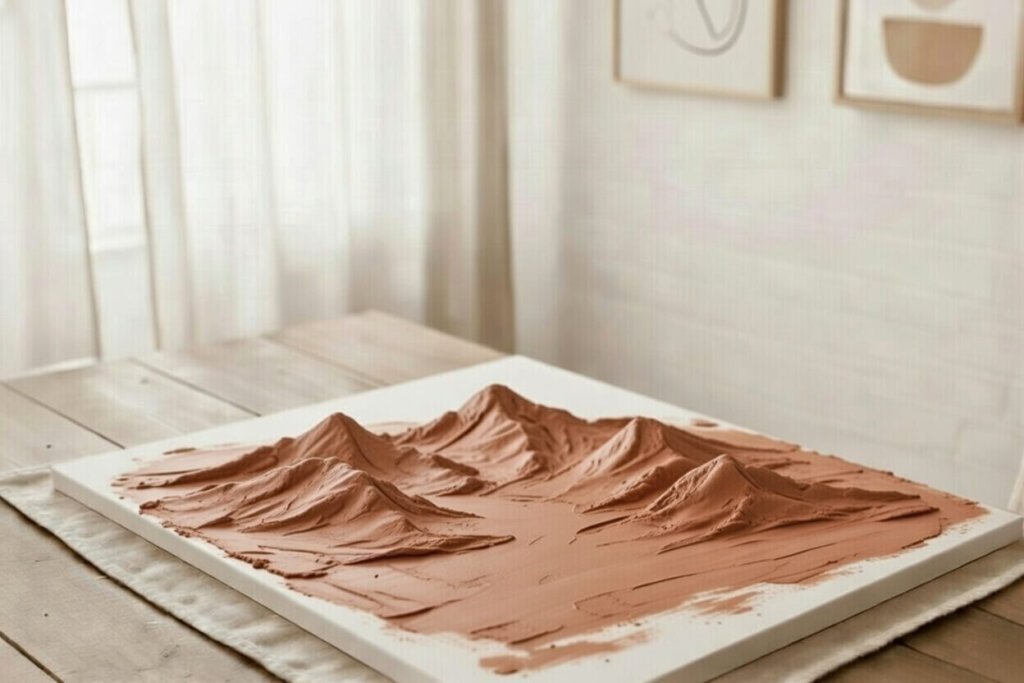
First one: Textured mountains (takes about 1.5–2 hours active time)

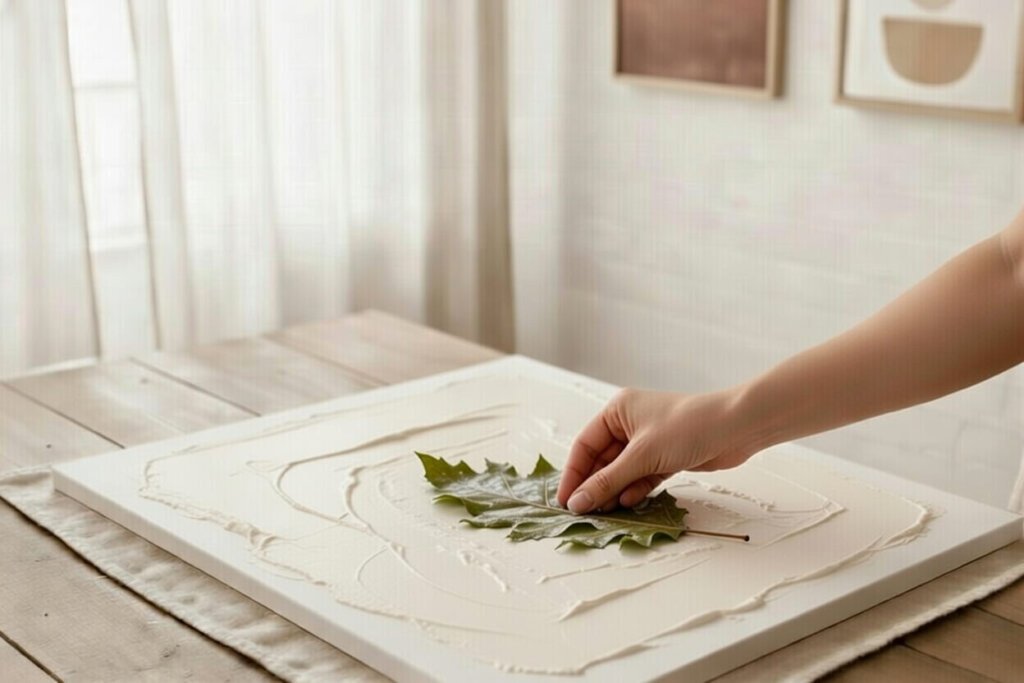
I start with two primed canvases side by side. I mix modeling paste with a touch of matte medium, then use a large palette knife to spread a thick, uneven layer across both, carving rolling mountain shapes, ridges, and deep valleys while wet-pushing and pulling to create those organic, wavy textures. I let it set for just 20–30 minutes until firm but still workable.
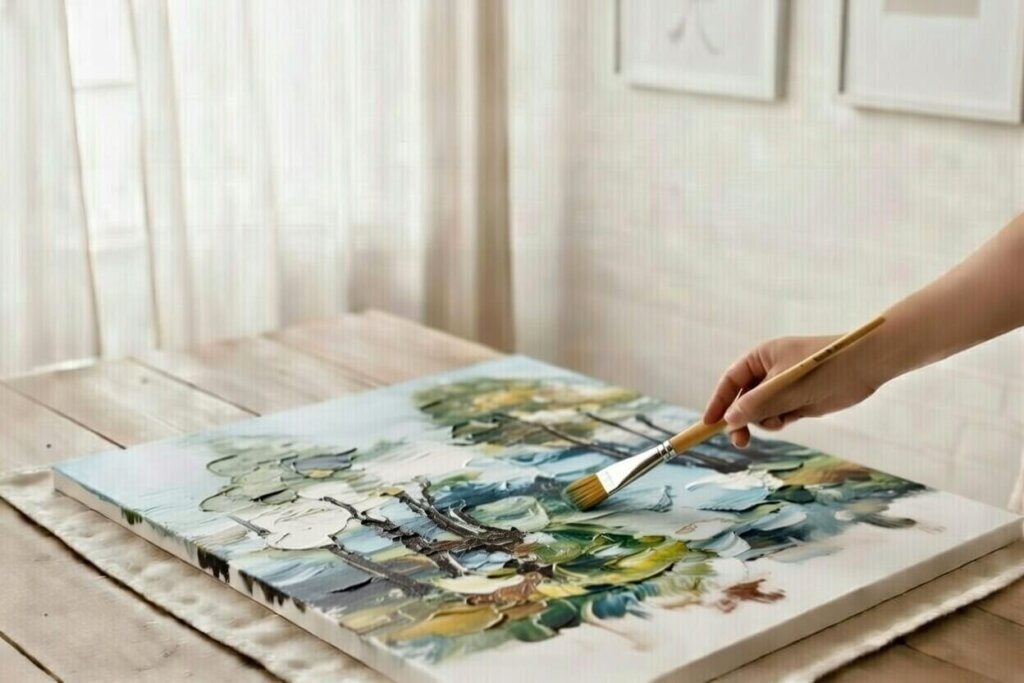
Next, I work with colors inspired by nature: soft creams, warm ochres, earthy browns, and subtle slate grays. Using wide and finer brushes, I apply lighter tones on the peaks to catch light, then blend the deeper hues downward for a gentle, delicate finish. I go back lightly with the knife to reveal texture underneath and add soft dry-brush details for depth. A quick thinned glaze unifies everything with a warm, natural glow. Let dry flat overnight. Now hanging in my living room, this duo brings such peaceful, grounded energy-like a touch of mountains right at home. Perfect for trying dimensional DIY textured canvas art!
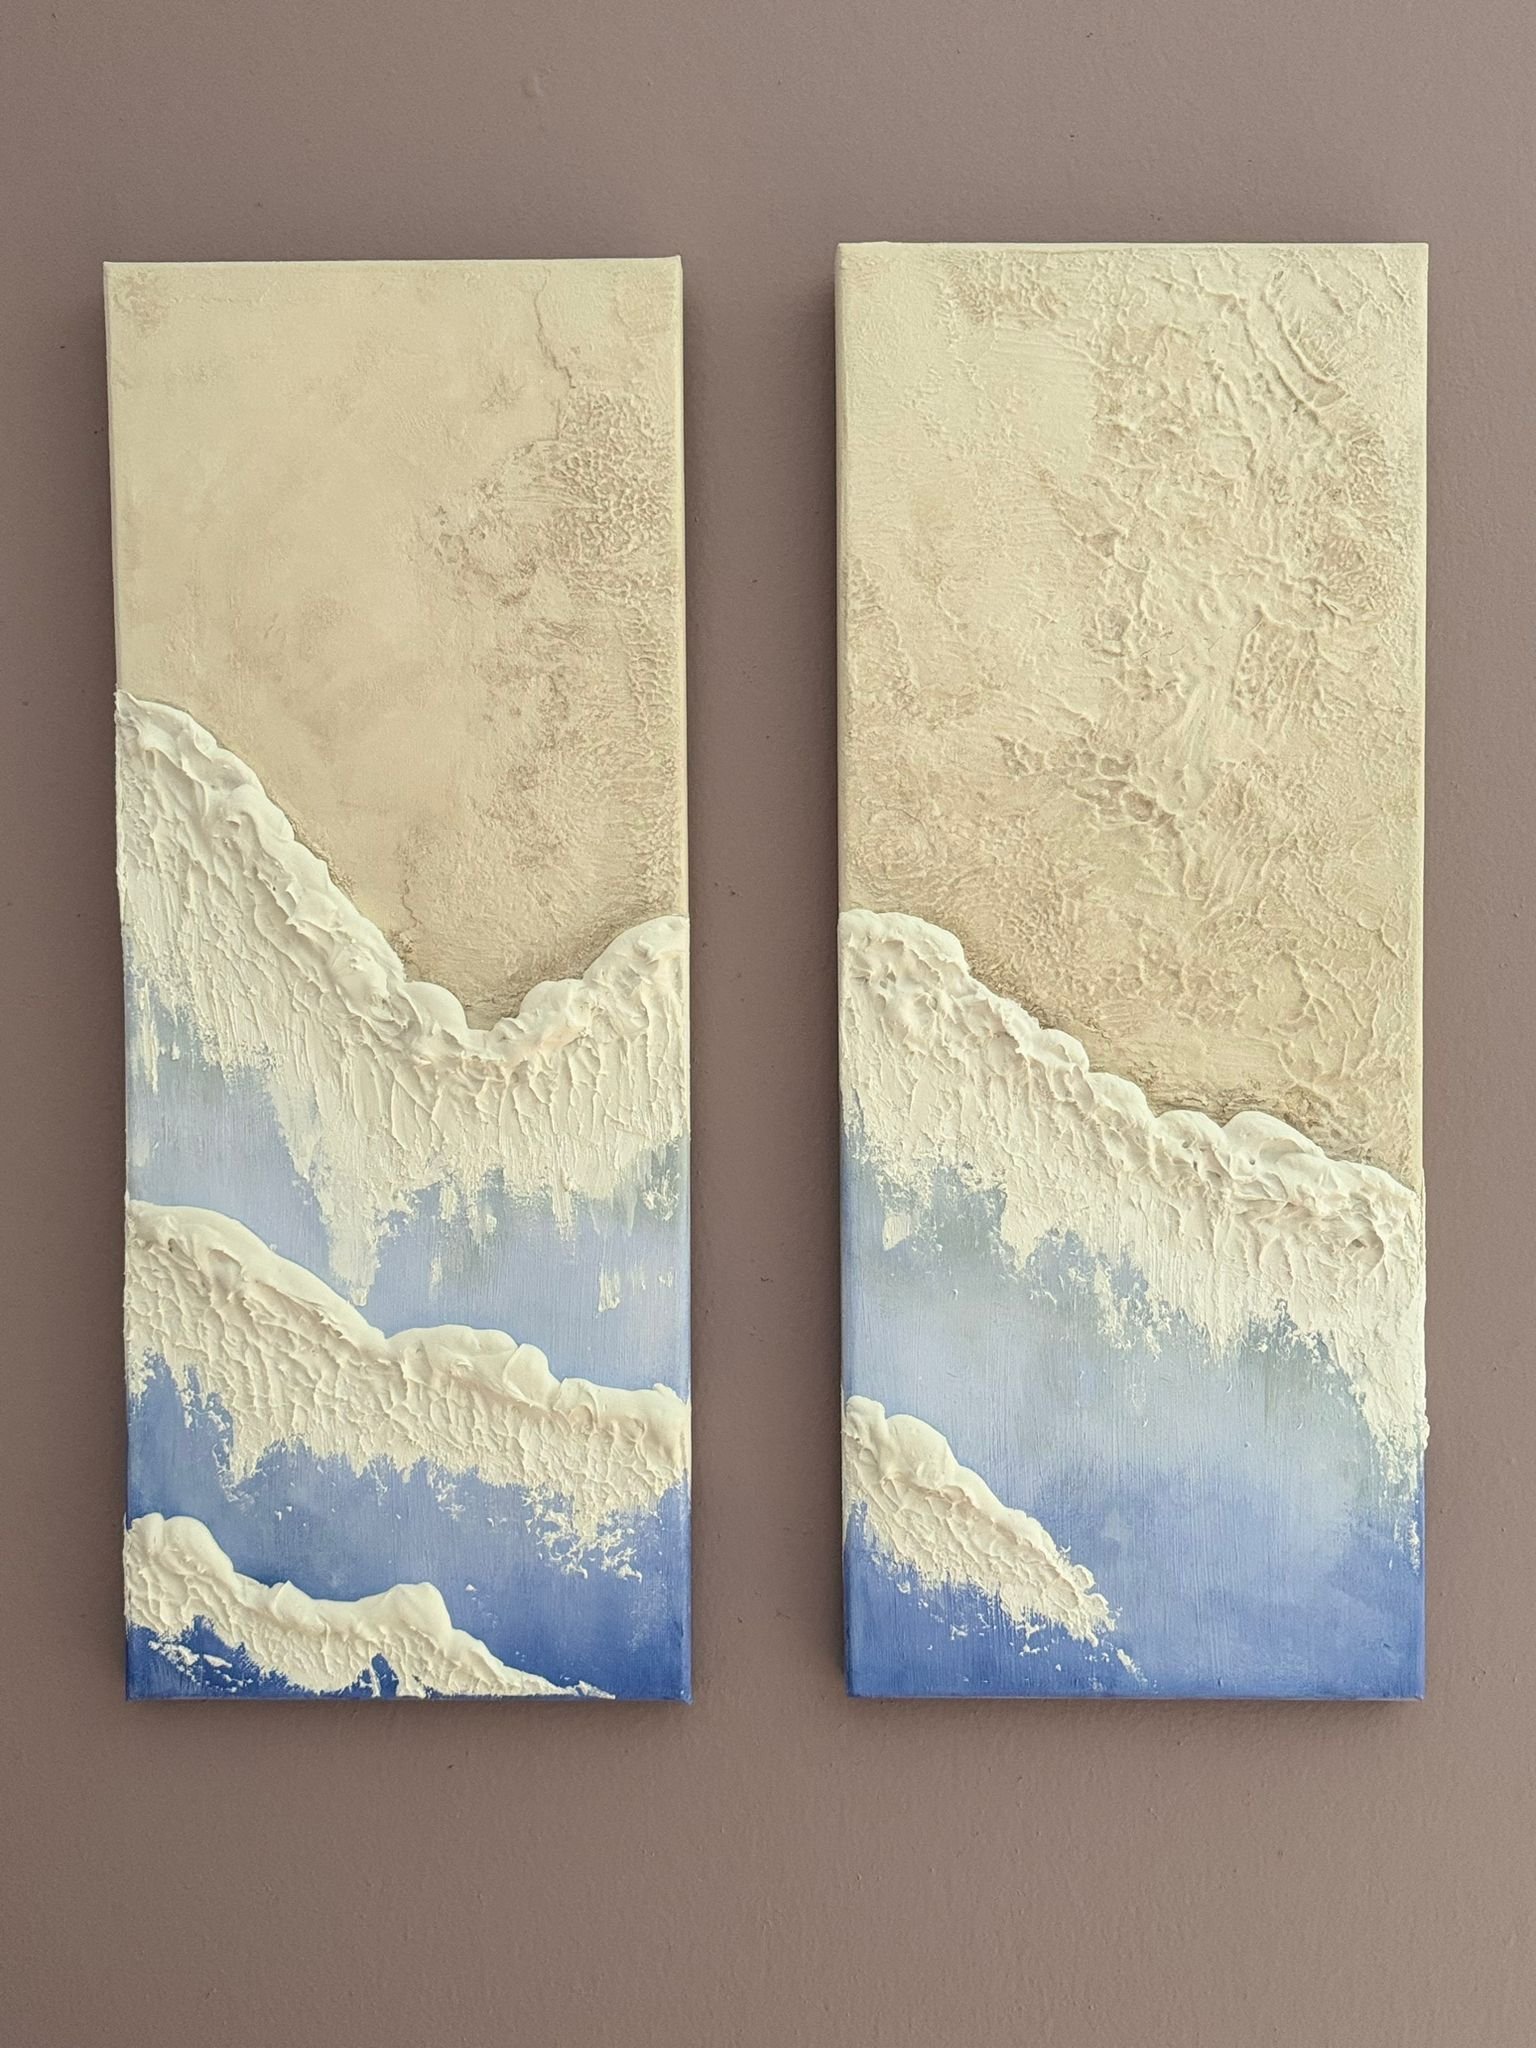
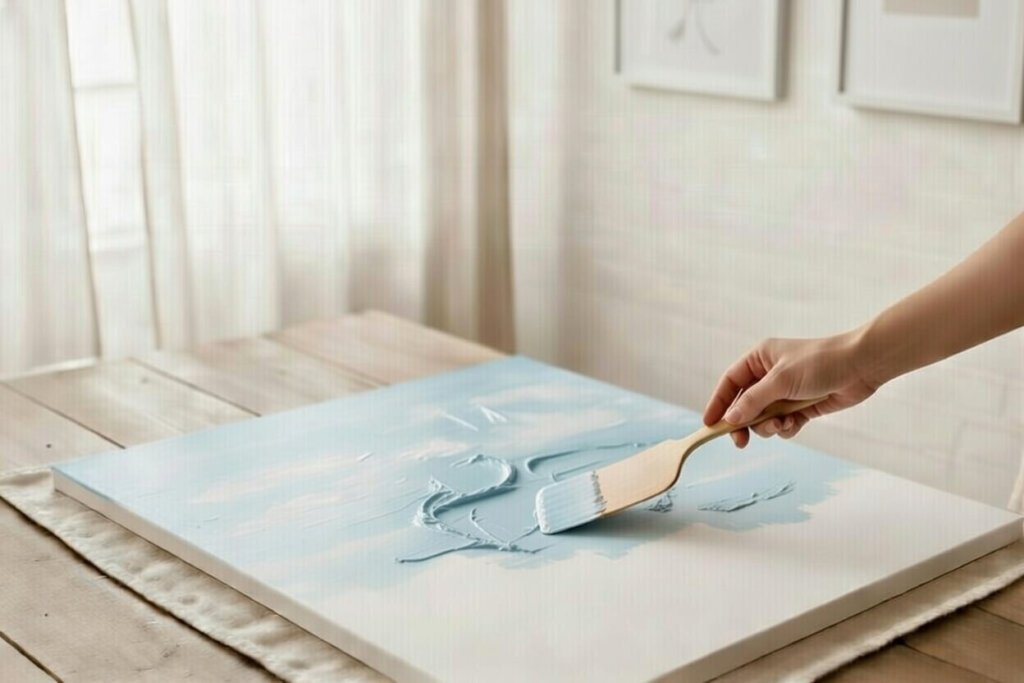
Second one: Textured wave foam (takes about 1–1.5 hours active time)

I start with two primed square canvases painted in a warm, sandy beige as base. I mix modeling paste with matte medium, spread a thick layer on one side of each using a palette knife, then grab an everyday laundry brush to drag and swirl through the wet paste, creating those irregular, foamy waves and ridges with easy, organic motions-letting it set for 20–30 minutes.
Next, I add colors inspired by nature like soft creams and pure white, using wide and finer brushes for a gentle, delicate application along the peaks and subtle blending for airy depth. A quick thinned glaze gives it a calm coastal glow, and after drying flat overnight, this simple duo now hangs above my sofa bringing serene, breezy energy-like a whisper of the sea at home. Perfect for easy, dimensional DIY textured art using everyday tools!
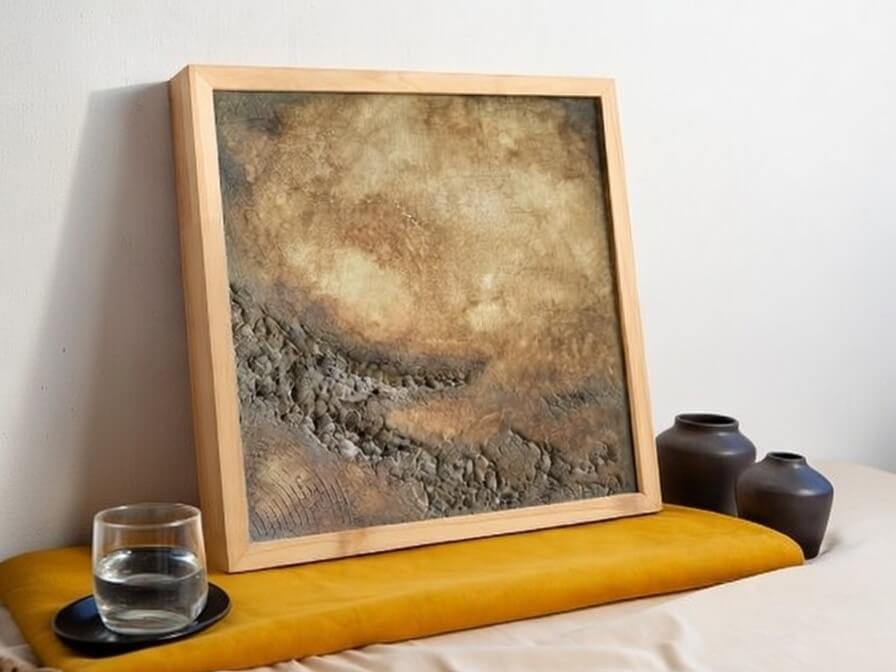
Third one: Upcycled wavy textured canvas (takes about 1.5–2 hours active time)

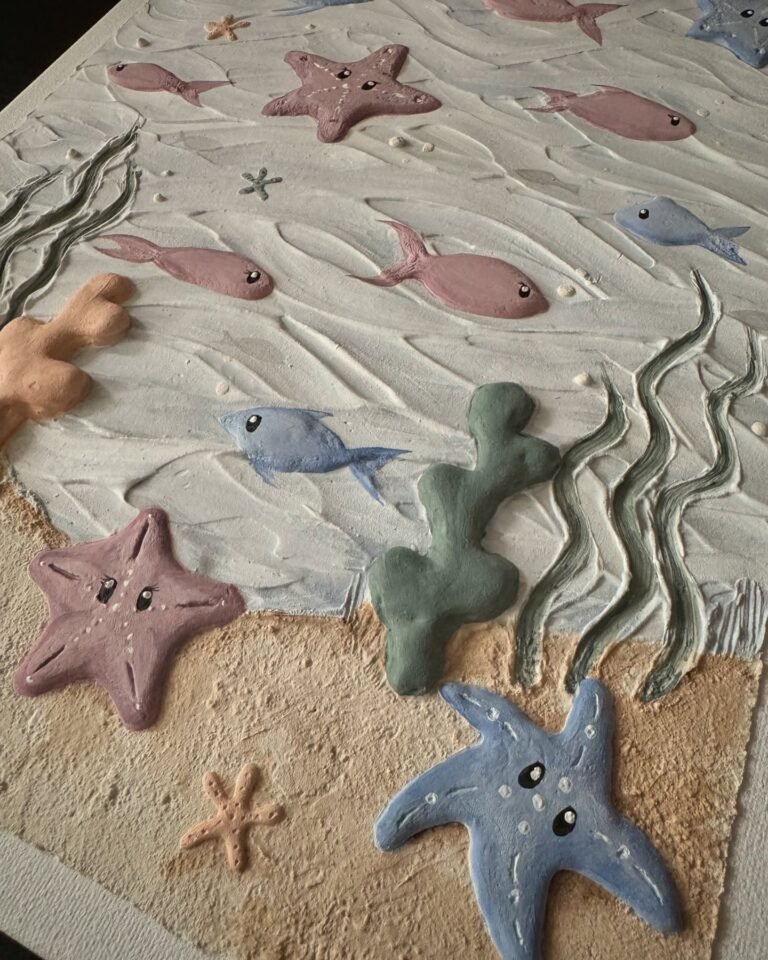
I found this large mass-produced canvas at a discount store-nothing special, just a basic print with some golden accents and a gorgeous gold frame that caught my eye. I decided to give it new life by transforming it into something truly mine. First, I mixed modeling paste with matte medium and spread a thick, uneven layer over the surface using a palette knife to build volume.
While wet, I used a simple tool (like a textured brush or comb) to drag and swirl through the paste, creating those flowing, rippled waves and organic ridges that add so much movement and depth. After letting it set for 20–30 minutes, I added soft colors inspired by nature-creamy beiges, warm taupes, and subtle whites-applying them delicately with wide brushes for gentle blending and highlights on the peaks. A light glaze unified the tones, letting the original gold peeks through for warmth. Now hanging in my living room surrounded by plants, this rescued piece brings such calm, luxurious energy-like a serene landscape on the wall. Perfect example of how upcycling a discounted find with texture can turn “meh” into meaningful DIY art!
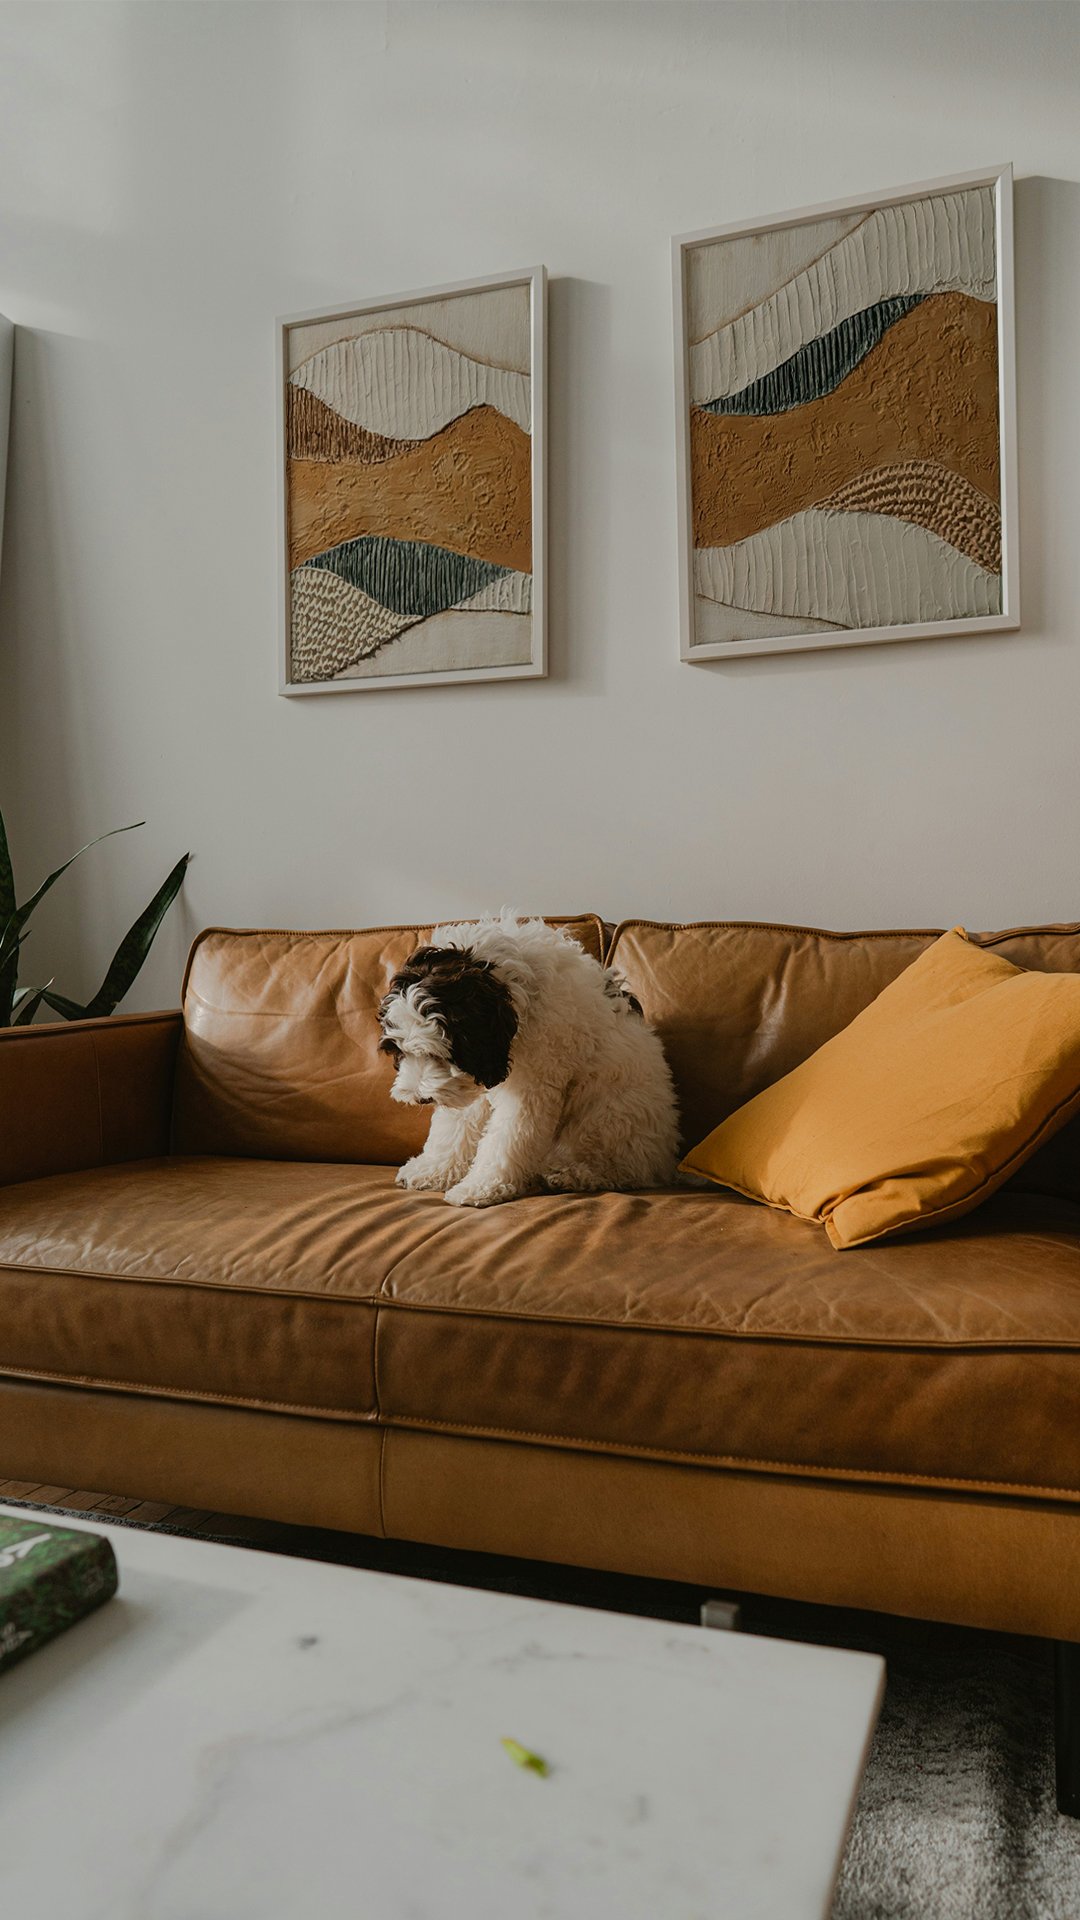
If you’re hanging them, I just add a sawtooth hanger on the back and call it done. No frame needed. Three of these grouped together on a big wall look like a quiet little gallery, and every single one has a story because I made it.
Whenever you’re ready to try it, grab a canvas and play. Start small if you’re nervous. The best part is that if you hate it, you just paint over it and go again. Your walls deserve something that came from your own hands.

You don’t need a full studio to jump in. I keep my kit small because I like grabbing it quick after a long day sketching floor plans. Focus on items that store easy and multi-use.
Basic paints top the list. Acrylics dry fast and clean up with water. Go for sets with 8-12 tubes in soft hues. Think muted blues for water effects or tans for sandy grounds. Brands like Apple Barrel work fine and cost little. Brushes come next. A flat one-inch for broad strokes and a round #4 for details cover most bases. Synthetic bristles hold up better than natural ones for beginners.
Canvas matters too. Start with cotton ones primed already. They take paint even without extra prep. Sizes from 8×10 to 16×20 fit walls without overwhelming a room. If you want to save, stretch drop cloth over wood frames yourself. That gives a raw edge I love for organic looks.
Next steps. Lay out drop cloths to catch drips. Palette options include plastic plates or wax paper for mixing. A cup of water keeps brushes ready.
For those wanting more feel, texturing agents add layers. Drywall compound from hardware stores spreads smooth and holds shape. Mix it 1:1 with paint for raised bits that catch light like real bark or waves. Baking soda or sand works if you skip buying extras. These build that depth without fancy tools.
One tip from my design days. Test colors on scrap first. Neutrals ground bolder accents, keeping pieces from clashing with your sofa or curtains.
Transform your living space with beautiful textured wall art by exploring easy canvas painting ideas that allow you to express your creativity. DIY canvas projects are not only fun, but also a perfect way to create unique pieces of art for your home. Whether you’re a beginner or an experienced artist, there are various techniques you can use to create stunning canvas art. From using white paint to create a minimalist look to experimenting with acrylic paint for vibrant colors, the possibilities are endless.
With a simple tutorial, you can learn how to create large-scale wall art or even small mini canvases that add a personal touch to your decor. Try painting landscapes, abstract pieces, or even a collage using materials from your local craft store. The right canvas size and paint colors can help you achieve the perfect piece that complements your home decor. So gather your paintbrush, a drop cloth, and let your imagination flow onto the canvas!
Prep sets you up to enjoy the process. Skip it, and paint might crack or peel later. I learned this fixing a client’s rushed piece years back.
Start by picking your spot. A table with good light works. Cover surfaces with old sheets. Dust the canvas lightly with a soft cloth. Any grit shows up in wet paint.

Prime if needed. Most store canvases come ready, but raw ones need gesso. Brush two thin coats on. Let each dry 30 minutes. Sand lightly between for smoothness. Gesso seals the fabric, so colors stay true.

Sketch loose ideas with pencil. Keep lines faint. For wall decor, think scale. A 12×12 suits entryways; larger for over mantels.

Let’s move to actual making.
These keep hands steady if drawing isn’t your thing. They build confidence fast.

Tape creates shapes without skill. Grab low-tack painter’s tape. Lay strips across the canvas in crisscross or grid patterns. Press firm but not too hard.
Mix paints on your palette. Two or three colors max. Soft grays and ivories give calm. Brush over tape in even strokes. Cover fully.
Peel tape while paint damp. Lines stay sharp. Let dry one hour. This makes great DIY canvas wall decor over a console.
I did one in bedroom tones last week. It softens the space like a pro piece. Total time: 45 minutes.


Texture brings pieces alive. It catches shadows and feels real under fingers. Perfect for nature lovers wanting more than flat color.
Drywall mud is my go-to. It’s cheap and molds easy. Spread with putty knife over canvas. Stipple or swirl for bark-like ridges.
Paint over dry mud. Earth tones sink into crevices. This creates raised landscapes that nod to hikes without leaving home.

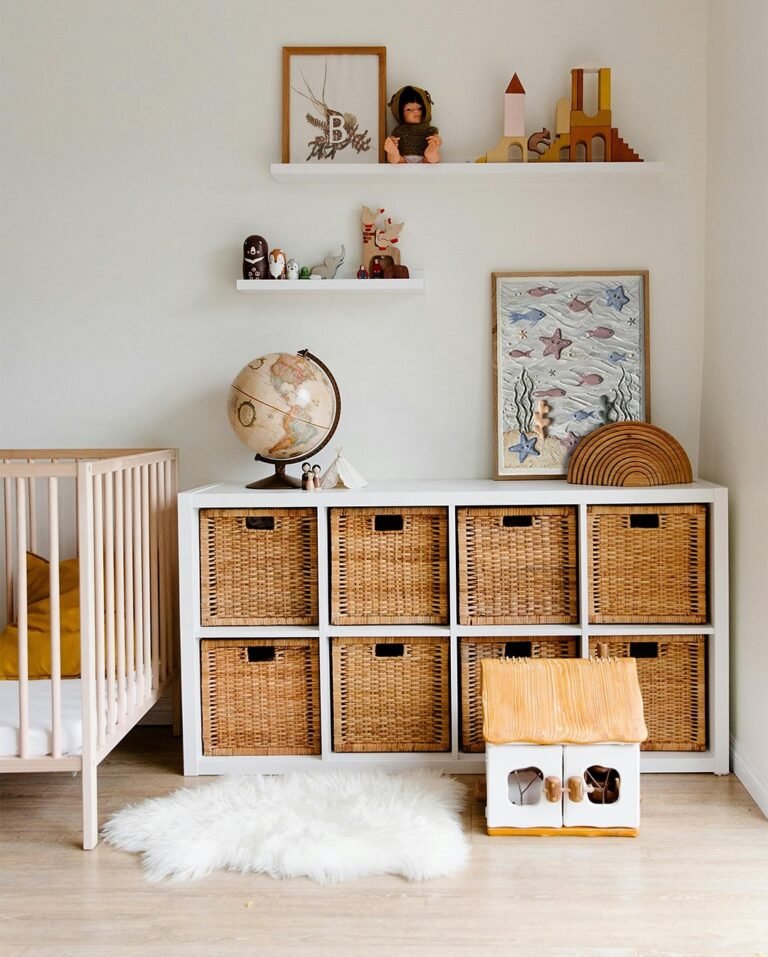
This turns basic canvas ideas into ocean decor. I hung one in a powder room. Guests always touch it. See our coastal wall art collection for ready versions.
Beginners nail this. Feels organic, like pieces from the yard.
This slims rooms visually. Great over beds.
Quiet and restful. Ties to forest wall art in shop.
Views like vacations. Frame in wood for cabin touch


Sign up to grab 10% off your first order and be the first to hear about new drops and exclusive deals!